Jewelry photography is a vexing issue for people who want good images of their work for show applications and their website but aren’t ready to hire a professional. There are plenty of good tutorials such as this one also about using natural light, or this one with many jewelry photography tips, not necessarily using natural light.
I wanted to share my setup that uses inexpensive, accessible materials and natural light. In a future post, I’ll address some simple (sort of) retouching techniques for those who have access to Photoshop or similar, but for whom the idea of retouching images is intimidating. (Stay tuned.)
But first…
DIY or Professional? Some considerations
You’ll often hear that you must have professional photography, especially if you are applying to juried shows. That advice makes sense because it has to take into account the broad spectrum of applicants, which includes people who place their jewelry under a lamp with an incandescent bulb and submit a photo with harsh shadows and a yellowy cast.
But that isn’t you, right? There’s a whole swath of people in between that scenario and those hiring a pro who believe that a decent photo is within their reach if they just had the right set up.
I’ve been accepted into good juried shows using my own photography. I don’t know if my photography sealed the deal or, conversely, if the rejections were because of my photography. Perhaps I made it through by the skin of my teeth! I’ll never know. But that shouldn’t stop me, or you, from tackling this yourself.
So…if you can’t afford a photographer now and/or you don’t have time to send pieces off to a photographer for a week, doing your own photography is not only possible but sometimes necessary. I need a decent shot of everything I produce, and I need to be able to do it on the fly. It might also be the case for you, as it is for me, that you haven’t yet decided which are your signature pieces worthy of a professional’s touch. But in the meantime, you still need some good images of your jewelry.
As a point of reference, here are the exhibiting jewelry artists for a high-end craft festival. You’ll see a range of images from jewelry on models to work on white, grey and graduated backgrounds. Some have the sleek touch of a high-end photographer. Others look more natural and do the work justice.
Back to the setup!
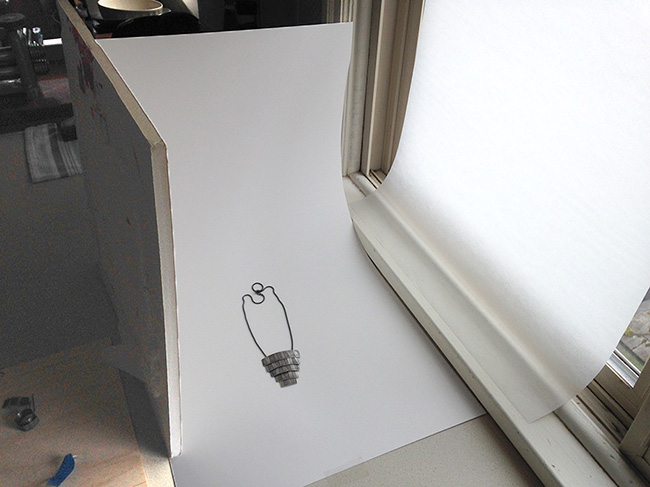
What you’ll need (see photo at top):
- Window
- Camera and tripod
- Tissue paper
- Paper backdrop (I used a Strathmore smooth white bristol paper)
- Foam core (or similar as a bounce card)
- Tape
Tissue: You’re trying to create diffuse light to avoid glare on your jewelry. Even on a gray day or in early morning light (best times to shoot), you still might need tissue. Simply tape it to the window.
Light: Most tutorials will suggest that you light from both sides creating very even lighting. I don’t mind an image with an obvious light source. However, you want to avoid dark shadows. To achieve completely even lighting, you’d need lights with diffusers on tripods or clamped to something. I’m keeping the setup simple. The bounce card (foam core) helps us with lighting by bouncing light from the window onto the opposite (in this case left) side of the jewelry.
Turn off all lamps in the room when shooting with natural light!
And then there are angles.
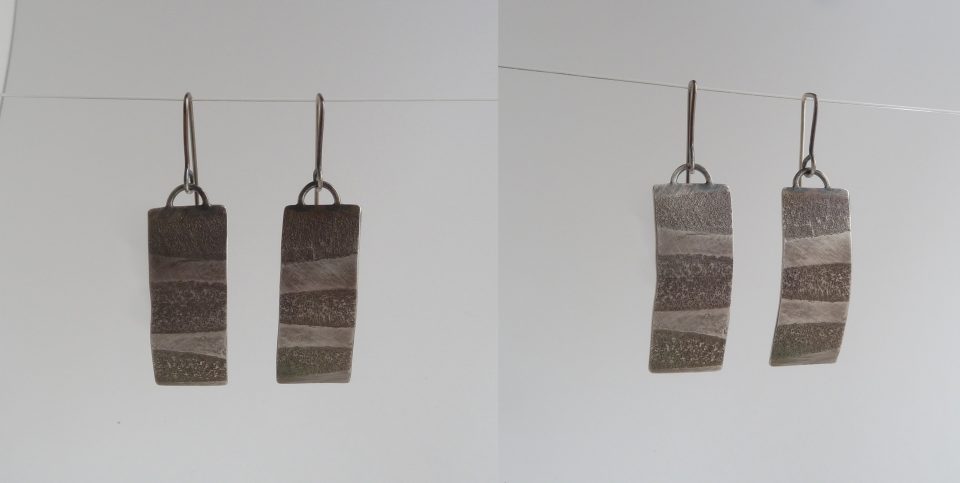
Instead of showing you an intimidating physics-0f-light diagram, I’ll show you an image (below) of the same pair of earrings. I simply moved to the left and right to see how my camera picked up the darks and lights in the earrings. From one angle, there might be too much glare; from another it will be too dark.
In other words, don’t move your display. Just move you and your camera and watch what’s going on.
I chose the image on the right because overall it had more even lighting and the light areas popped more.
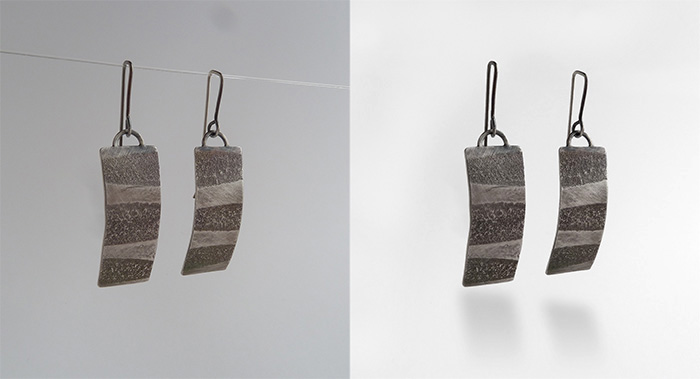
Below you’ll see the original at left and retouched on right. I got all fancy with a pretend drop shadow. It’s not that hard to achieve. (I’ll cover that in the retouching post.) I’m not a big fan of the floating-in-mid-air earring because the setup (below) is a bit fussy. It’s good practice though, to show some earrings as they would look hanging, but I shoot most of my earrings flat.
Foam core: You’ll see I propped up a piece of foam core on the left. This is my bounce card. You can use anything white. Test this yourself to see why it’s necessary.
Try this…
Look at your piece of jewelry. Take the card away, then put it back. See how the shadows change? You have light coming from the window on the right. This will cast some shadow. But see how the bounce card reduces the shadows and also casts more even light on the left side of the jewelry? We can do this!
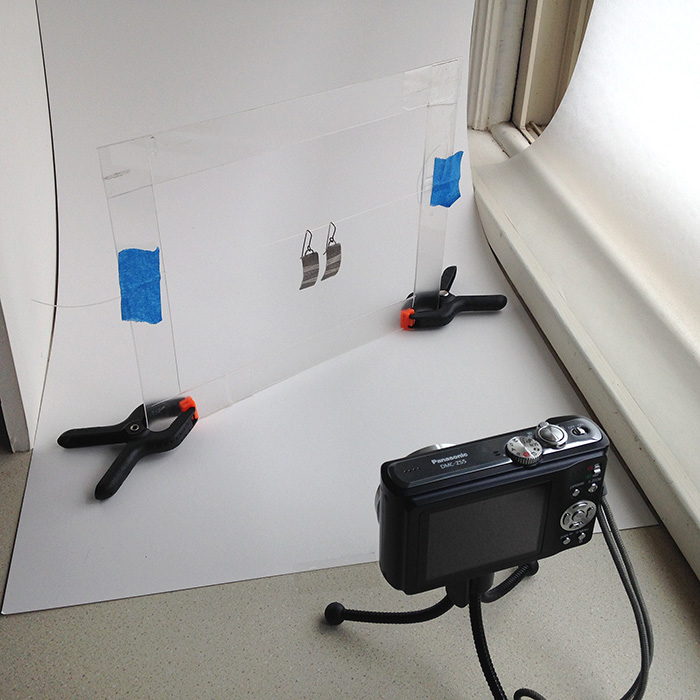
Paper backdrop: Also called a sweep. Smooth, matte finish paper will yield the best results. (Oxidized jewelry does leave marks on the surface. Place and pick up with care.) Behind my sweep is a super fancy cardboard box (Cost: none). I taped the paper in back and also on the counter in front to prevent slippage. If you have your table against the wall, simply tape the paper to the wall.
Camera and tripod: Honestly, I often use my iPhone with good results. However, it does have a wide angle lens by default, meaning that the closer you get to the subject, part of your image will be in focus, part not. I happen to like this effect (called shallow depth of field). But for show images you don’t want to get too sexy. You’re going for a good depth of field so the entire piece is in focus. You’re best off using a digital camera. If you have a manual setting, set it to aperture priority (is your head spinning?), then set it to highest number your camera will go. Or forget it and just use the Program mode.
You’ll want some stability for the camera. This is critical because if your shutter speed is slow (because of your aperture setting), your image will be fuzzy. If you don’t have a tripod and you can easily bolster your arms on a surface, you can take a photo without camera shake.
Earring support: I actually like to lay earrings directly on the paper. Some earring styles work well that way, others don’t. It’s handy to have different views, especially for an online shop where you might want to show the same piece from multiple angles. You can see how DIY my setup is. A piece of plexiglass with a cutout hole, fishing line, tape and mini clamps. You could use an empty picture frame or a piece of white mat board instead. (Note that you will absolutely need to retouch the fishing line out of the image.)
Retouching: You will almost always need to retouch photos. I emphasize “almost” because, good golly, the iPhone (or similar) with its bevy of built-in filters, or especially an app like Camera+, will do wonders for an image. This is a great option when you’re in a pinch or want to post good images to social media accounts.
Of course, it does help to know the difference between a good image and bad but all is not lost if you don’t own Photoshop. The key is restraint. Don’t overdo it with any adjustment tools because this generally creates noise (grainy areas of the image). Using an app is not the preferred method, but this post is about DIY and about getting over the hump of thinking you can’t do your own photography. Ideally, you will want Photoshop, and you should expect to do a little work on every image if you have even the slightest inclination to do all this yourself. It will be a good investment.
You can also shoot the work yourself and have the images edit by someone else.
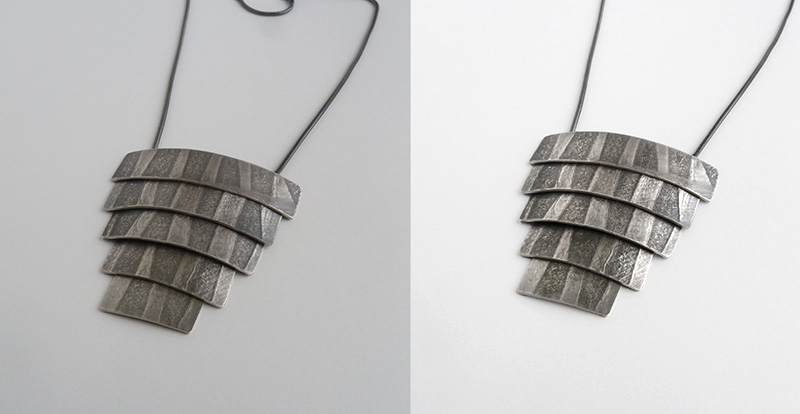
Below is the final necklace image I’ll be using (at right). On the left is the original shot. (I wish I’d straightened the chain a bit more!)
Final thoughts
You might be asking, shouldn’t I shoot my jewelry on a graduated background? While it is true that juries expect graduated backgrounds for show images, the reason is not what you might think. Juries spend hours in a dark room looking at hundreds or thousands of images. All-white backgrounds can be jarring for them because of the glare. If you’re doing your own photography and don’t have Varitone paper (it’s surprisingly expensive and hard to find small sheets), or don’t have the technical skills to fabricate this look digitally, just shoot a good photo and be careful not to blast the background to sheer white. You’ll see in my photos that I leave a very light grey tone to my otherwise “white” background.
I think, and some of you probably do too, that graduated backgrounds look a bit old fashioned. The trend in product photography is white or more natural looking, and even tasteful use of props. You can also used varied product photography on a website.
If you do want to shoot on a graduated background, see this post that uses the same setup as mine.
…….
With very little money, some sound judgment and taste and a little effort, you can produce very good images for use in both your own promotional efforts as well as juried craft show applications. It will probably come as a big relief to one day hand off your jewelry to a professional to work their magic. Until then, you’re all you’ve got. I think you can handle it.
Have any questions or thoughts? Share them for the peanut gallery.