I have only done a few shows in my past. Well, a couple more if you count pottery back in the 90s where I draped a table and put pots on it. The others were fairly easy to set up, but that didn’t stop me from turning the display into a project itself.
Like this one (below) for a two small jewelry shows where I painted paper maché boxes and lids with chalkboard paint (a nice matte finish). I also painted a big piece of MDF board (lighter weight and cleaner finish than plywood) for a surface for the display, which I raised up using Ikea’s Capita legs. These are great and come in three sizes (2, 4 and 6 inch) in packs of four.
I was quite happy with this because it was very inexpensive, aside from labor, and the uniform look makes the jewelry stand out. Too many displays are chaotic with their variety. I favor one type of display material to tie it all together. I filled the smallest boxes with black sand from a plant nurseries to prop up rings.

I both love and hate figuring out the display part of a show. Love, because I dig the design challenge of creating a cohesive, sophisticated display without spending a lot of money. I get to call forth my Martha-Stewart-meets-MacGuyver persona. Hate, because it takes away from making actual product, and I can lose myself in the process if I’m not careful because I become a little obsessed.
Here’s what I mean.
I spent an entire Friday night designing my ideal display (below) for the upcoming Affordable Art for Everyone show. This will be the first time I’m in a large space (8′ x 10′). I figured most artists would have a table with some art, or the black metal grid wall display system, which I don’t like because the grid is too big and see-thru. I wanted to create an environment. Scaling the art to size helped me figure out how much art I needed. (Read: need to make more art.)
I abandoned this idea because putting it together would have taken too much time, though I sort of regret not doing it. It wouldn’t have involved much more work to create than the panels I did make. But this design would have required a lot more on-site assembly.

I finally settled on making panels resembling the ProPanels often used by fine artists. Their carpet-like surface allows art to be hung using either drapery hooks, velcro or other hanging systems. The ProPanels can be free-standing or hung from a canopy tent. They are two sided where mine are not.
Materials & Process
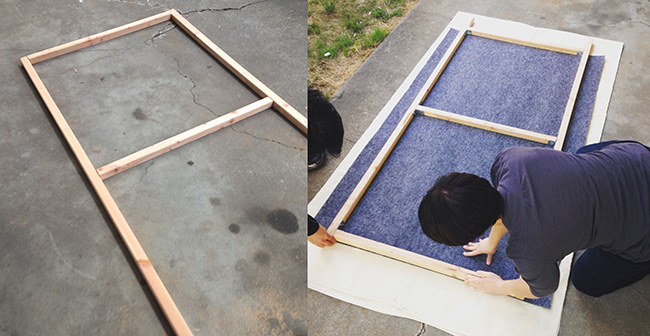
I used nine, 8 foot 2 x 2s (which are really 1.5 x 1.5), L-shaped corner brackets and indoor/outdoor carpet from Home Depot. The carpet comes on 6-ft rolls, and Home Depot will cut the width to any size. My finished panels are 6 1/2 feet tall x 35 in. wide. This left 6 inches of feet at the bottom. The width was determined by dividing the 2 x 2s into equal thirds (32-inch wide cross bars plus the combined 3″ from the vertical posts = 35 inches wide). Easy math!
The carpet part is three-person job (thanks to friends who helped me) because you need one person to pull the carpet taut, another to hold down the panel and the last to staple.
All materials cost just under $100. How are they going to stand up? I knew you’d ask that. My plan is to add a strip of wood on the bottom perpendicular to the frames using L-shaped brackets and weighted down for stability.
It helps to have friends with a lot of home projects under their belts. Sierra, below, is an interior designer. She is more anal than I am if you can believe it. This is a good thing.

And…the finished panels (below). Yes, I do see the staples at the top. Touch-up with gray paint is on the to-do list. Won’t the carpet be wobbly, you ask? If, when I test the drapery hooks, the carpet is too wobbly, I’ll add some simple balsa wood strips to the back for extra support (That’s the beauty of an unfinished back!) and/or put some foam panels behind there. But isn’t the show only a few days away? Yes, thanks for the reminder.
Great looking panels! For these 35″ wide panels, what are the dimensions of the plywood for stability? Does it allow the panels to be placed next to each other? Does it stick out in front any? Thanks for sharing!
Hi Cindy, Thanks. I didn’t use any plywood. I just made wood frames and then stretched the industrial carpet around, holding it tight (need 2 people but 3 is better) and used a staple gun to secure the carpet. In theory, if perfectly square, yes, they should stand next to one another. I used perpendicular pieces of wood for the feet, coming out in front and back, secured in with L-brackets. You can also clip the panels together using clamps in back. I’d also use some weight bags on the back feet to keep down.
I had no buckling of the carpet at all. It’s very sturdy and you can hang art using upholstery hooks.
This was a timely post! I am getting ready for a show in December as well as setting up a permanent photography area. thank you!
Thanks Janice. I have a great checklist for art/craft shows that I compiled from a number of sources. If you’d like a copy, send me and email at jane.pellicciotto (at) gmail.com and I’ll send it to you.
I also have a Pinterest board on displays if you’d like to check it out.
Hi, this is a really great post! I wanted to see if you had an updated picture of the leg supports. I loved your idea for the panels but I make metal art and some of my pieces are heavier. I wanted to see how the legs looked when you finished them.
Hi Dan,
Thanks. I don’t have a photo but I could email you a crude sketch. Basically, I took 2 pieces of the same frame wood, about a foot long, and I used metal L-shaped brackets to attach them coming out perpendicularly from the vertical posts. I ended up using the L-shape that fit into the crease like the top of your angle and top of your foot. It would have been steadier to have maybe a T-bracket upside down to attach to the 3 faces (if you were looking at the panel from the side). I think there are several possible solutions, even having only feet coming out from the back to avoid tripping over them, maybe weighted down with sand bags.
This carpet stuff is surprisingly sturdy, especially if you pull it really taught.
I’m not looking at the original post right now but I had clamps on hand to make the 3 panels snug together. Because they weren’t perfectly square, there was a bit of wobbliness, but I just weighted down the feet.
Lastly, make sure these fit in your vehicle! I didn’t plan for that and had to borrow a friend’s Element.
Hey Jane,
I’m looking for the “6ft indoor/outdoor carpet roll” on The Home Depot website….too many options…could you be more specific?
Alberto.
Hi Dan,
I looked too. Yes, the do have a lot of types online. I’m sorry I can’t recall the exact one. But when you go to Home Depot, there really aren’t many choices for a charcoal gray like the one I got. It was your basic industrial carpet. No visible pattern. Just gray.